Two weeks ago while pursuing the online computer classifieds I came across something I didn’t think I’d see locally for some time, an Oculus VR headset at a reasonable price. After the announcement that Oculus wanted $600 USD for the upcoming consumer version (known as CV1 in the Oculus community) I figured my dreams of trying modern VR were all but washed away, except for maybe the odd industry convention for the foreseeable future. Here are three things that I’ve learned after acquiring and using my Oculus DK1 for more than a week.
#3 The Actual Hardware Is Pretty Easy To Come By

Despite being labelled as a “development kit” the two development kits released to the public for the Oculus Rift – the DK1 and DK2 respectively – have been adopted not only by developers as the current defacto standard for VR but also by a dedicated community of enthusiasts. This shouldn’t be too surprising since the whole thing started out with a momentous KickStarter campaign but to find one locally was a real treat.
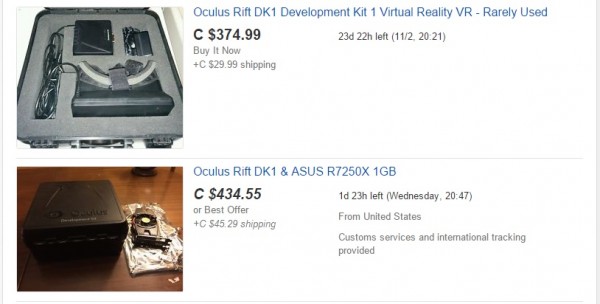
For those not wanting to pay the absolutely flooring $600 USD price tag and have a chance to try out VR before the rest of the world – like the tech hipsters some of us are – the opportunity to get a piece of development hardware is hard to pass up. Generally a DK2, that is the second generation development kit that is closer to the final CV1 model will run you about $450 – $600 CDN including shipping if you are buying one online. I got mine locally, and decided to go for the first kit despite it’s bleak future of absolutely no support when it comes to commercial games in a few months so I could save a few bucks. I’ve seen DK1s listed as low as $180 CDN which isn’t so bad to enter the world of virtual reality – just don’t expect any kind of longevity out of your prototype development hardware that is far surpassed by the upcoming consumer model.
#2 Setting Up Your Oculus Rift Can Be A Bit of A DIY Nightmare

After pining over technology like the Oculus Rift for quite a number of years and never having the chance to try VR, with the exception of Google Cardboard which absolutely floored me, I finally had the sleek black development kit in my hands. The big question the moment I brought it home was “will this thing even work on my gaming rig?”.
Before purchasing the Oculus Rift DK1 I knew that my current gaming rig wouldn’t meet the recommended requirements for the CV1. The necessity of a $400+ CDN graphics card – the Geforce 970 – pretty much assured me of that. But before I could even worry about whether or not my games would run at an acceptable pace I had to get the Rift set up properly.
Hardware wise the DK1 (and presumably the DK2) are fairly simple to set-up. The head mounted display usually sits in my nice soft Oculus box while I plug the HDMI connector, single USB cord (2 on the DK2 and 3 on CV1) and power supply into the control unit. After that it should be as simple as flipping the switch and playing some immersive games, right?
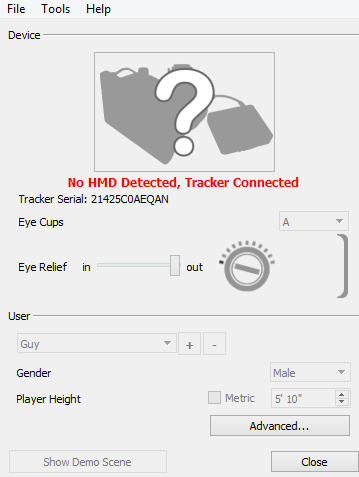
Unfortunately not quite, even with the Oculus Runtime (and optional SDK) installed there is no guarantee that your computer will detect your device. I had this issue with Runtime versions 0.8 and 0.7 – both told me that no device was connected and although head tracking worked fine on 0.7 I couldn’t actually change any of the Oculus specific settings like IPD or run the calibration demo.
Once you’ve decided on which games you are going to play with your new shiny Rift you need to know three basic things:
- Does the game I am intending to play have native Oculus support?
- If it doesn’t support Oculus natively does it have SBS 3D (side by side 3D) support built in?
- Does the game have built-in head tracking support?
Once you have the answer to all of these questions you can begin tailoring your Virtual Reality experience to the particular game that you are attempting to play. Most of the time, at least in the week I’ve owned an Oculus, this has meant getting upwards of two or three pieces of software to work in concert to make the Virtual Reality experience more than just a pipe dream or a heap of crashing code.

If you’re game does not have Side By Side 3D or optimally an Oculus enabled port you’ll need to use what’s known as a 3D Injector to get as near perfect a 3D image as you can to run to your headset. Currently there are 3 main injectors that appear to be popular: The first is VorpX which is a commercial piece of software that not only provides stereoscopic imaging for DirectX 11 games but also has built in head-tracking support for most games. Next up is Tridef 3D Ignition which works similar to VorpX in that it can produce a 3D image from a 2D game and also supports Side by Side imaging. Tridef’s Oculus runtime is currently in open beta and wouldn’t work with my specific rig, so I’ve been using SBS which is less than ideal in some cases. Tridef is also $20 USD cheaper than VorpX so it might be worth it for the budget minded, Tridef also offers a 14 day trial which is great because as far as I can tell VorpX does not. Last-up is Vireio Perception which is an open source free 3D injector but it only currently supports DX9 games, so if you want to play anything recent this might not be the choice for you.
Next up is your head-tracking support. Obviously head-tracking support is ideal for first person games like Fallout 4, Elite Dangerous, Skyrim and others but if you want to add it to say Civilization V or a third person title I’d say go for it. Native Oculus titles like Elite and Half Life 2 will have built-in head tracking that will work with your Oculus SDK usually with very little setting adjustment. If the game you are playing does not support head-tracking there are free Python scripts that will mirror head tracking to your mouse. Surprisingly this script has been my go-to when using my DK1 with unsupported games and aside from having to adjust the sensitivity from time to time it has worked pretty well.
#1 Don’t Set Your Expectations Too High – This Stuff Isn’t Publicly Available For A Reason

Hopefully as you can see there is a lot to consider when making the decision to jump into VR. Whether you are going to be purchasing an Oculus Dev Kit, the upcoming consumer model or products like Razer’s Open Source VR there is a lot of tweaking that is required to make the experience work properly. Whether that’s tweaking graphical settings to get the optimum Frame Per Second, adding stereoscopic 3D to games that don’t support it or making sure your head-tracking won’t make you nauseous. There’s a reason the currently available hardware / software kits are aimed at enthusiasts and developers and aren’t being sold to the general public. If you’re going to get into VR in January 2016 be prepared to get your hands a little dirty behind the scenes and learn the ropes because VR isn’t quite ready for prime time just yet. We aren’t at the stage where you can just plug in a VR headset into your PC and play games without concern.
